linux

All posts tagged linux

At my dayjob I often listen to music while working, and sometimes I’m doing video calls with my team. To help avoid disruption, I put an RGB LED on top of my cubicle wall and wrote a script to update the color based on my activity. Red indicates the camera is active, amber indicates I’ve got music going, otherwise green.

#!/bin/bash
#
# Monitor the camera and audio to set LED color
# if camera active --> RED
# else if audio active --> YELLOW
# else --> GREEN

exec 2> /dev/null

COLOR_OLD="#ABCDEF"
while :
do
  COLOR="#00FF00"
  if lsof /dev/video0 > /dev/null ; then
    COLOR="#FF0000"
  else
    AUDIO=`pacmd list-sink-inputs | grep -c 'state: RUNNING'`
    if [ "$AUDIO" == "1" ]; then
      COLOR="#FFAA00"
    fi
  fi

  # Only update blink1 if the color has changed
  #echo "\"$COLOR\" vs \"$COLOR_OLD\""
  if [ $COLOR != $COLOR_OLD ]; then
    echo "Color: $COLOR"
    blink1-tool --rgb "$COLOR" > /dev/null
    COLOR_OLD=$COLOR
  fi

  sleep 0.1

done

I wanted to play Minecraft on my 64-bit Ubuntu Linux install, but it wasn’t working correctly for me, and would give a black screen after login, and the console reported some errors about xrandr (which might be related to my odd “dual display-port + docking station” setup at home). After some searching, I found a tip to manually install the LWJGL java libraries into the ~/.minecraft/bin/ folder, to have the latest and greatest version of those libraries.

  1. Download the latest version zip archive of the LWJGL libraries: http://sourceforge.net/projects/java-game-lib/files/latest/download?source=files
  2. Extract downloaded zip archive
  3. Copy all files in lwjgl-2.9/jar/ to ~/.minecraft/bin/
  4. Copy all files in lwjgl-2.9/native/linux/ to ~/.minecraft/bin/natives/

And then you should be good to go.

via https://bbs.archlinux.org/viewtopic.php?pid=876274#p876274

Update: Looks like Transmission sends traffic out the loopback (lo) interface, to the loopback interface. Seems kind of weird, but it should be harmless. These rules should permit traffic from the vpnroute gid to pass to the tun0 and lo interfaces, but everything else will be rejected. You can also duplicate the last rule with a LOG target if you want to see what is still being rejected.

sudo iptables -A OUTPUT -m owner --gid-owner vpnroute -o tun0 -j ACCEPT

sudo iptables -A OUTPUT -m owner --gid-owner vpnroute -o lo -j ACCEPT

sudo iptables -A OUTPUT -m owner --gid-owner vpnroute -j REJECT


We recently moved into a new home where we have a shared internet connection with the other occupants of the duplex. I didn’t want to use bittorrent directly, since any nastygrams would end up with the landlord and cause problems, so I signed up for the IPredator VPN service in Sweden. It allows you to make an encrypted and secure connection from your computer to their network, so all of your internet traffic is funneled through the secure connection, making it so that the neighbors, landlord, and internet service provider can’t tell what I’m up to. The VPN was really easy to set up in Ubuntu Linux with the graphical network manager (IPredator provides a visual guide to this process) and the speeds are certainly reasonable.

One downside of this is that if there is a connection hiccup that causes the VPN to drop, the bittorrent software will just fall back to sending data out the regular, unencrypted network interface, potentially exposing your naughty activities to the ISP. I wanted to find a way to effectively say, “only allow bittorrent traffic through the VPN connection” that would step up and protect things if the VPN connection dropped.

On Linux, the standard firewall is called “iptables”, and can do just what we need, in only three commands. But first, a couple of assumptions:

  • I am assuming that you are using the default Ubuntu Linux bittorrent client called “Transmission”, which is executed using the command “transmission-gtk”.
  • When the VPN is connected, it creates a new network interface called “tun0” (“tun” for “tunnel”).

The general plan is to somehow tag the bittorrent traffic so that the iptables firewall can identify the relevant packets, and reject them if they aren’t heading out the secure VPN interface tun0. An easy way is to run your bittorrent program using a different UNIX user or group.

Here, we add a new group called “vpnroute”:

sudo groupadd vpnroute

Then, we add the firewall rule that rejects all traffic from this group that is not heading out tun0:

sudo iptables -A OUTPUT -m owner --gid-owner vpnroute \! -o tun0 -j REJECT

Finally, we start up the bittorrent software with group ownership of vpnroute:

sudo -g vpnroute transmission-gtk

Your torrents should now only run when the VPN is connected. Try it out with some safe torrents, like the Ubuntu ISO files, and make sure that they only download when the VPN is connected, and they should stop right away when you disable the VPN.


If you want to confirm that the firewall rule is actually matching your traffic, you can add a similar rule that does the LOG operation instead of REJECT. You need to ensure that the LOG rule happens first, because after handling the LOG rule the packet keeps going, while a REJECT action won’t let the packet continue down the chain of rules. You can remove the output rule with “sudo iptables -F OUTPUT” (F for Flush), and then:

sudo iptables -A OUTPUT -m owner --gid-owner vpnroute \! -o tun0 -j LOG
sudo iptables -A OUTPUT -m owner --gid-owner vpnroute \! -o tun0 -j REJECT

Then you can check the output of “dmesg” to see when packets are logged (and then rejected) by the firewall.

I recently needed to keep a Bash script in a centralized location, with many symbolic links to that script sprinkled throughout my repository. I wanted the script be able to determine both the user’s PWD, as well as the true location of the script. Based on all the different suggestions found online, I created a little test script to see how well each suggestion worked:

#!/bin/bash

echo "\$0"
echo $0
echo ""

echo "pwd -P"
pwd -P
echo ""

echo "pwd -L"
pwd -L
echo ""

echo "which \$0"
which $0
echo ""

echo "readlink -e \$0"
readlink -e $0
echo ""

echo "readlink -e \$BASH_SOURCE"
readlink -e $BASH_SOURCE
echo ""

I put this script (test.sh) in ~/ and then created a symlink to it in a different directory. Here are the results.

My friend JT left a comment below to say that using $BASH_SOURCE is probably the better choice than using $0, since $0 can be changed, and is only set equal to the file name by convention.

Directly calling the script from the same directory (/home/matthew/):

matthew@broderick:~$ ./test.sh
$0
./test.sh

pwd -P
/home/matthew

pwd -L
/home/matthew

which $0
./test.sh

readlink -e $0
/home/matthew/test.sh

Directly calling the script from some other directory (/some/other/directory/):

matthew@broderick:~/some/other/directory$ ~/test.sh
$0
/home/matthew/test.sh

pwd -P
/home/matthew/some/other/directory

pwd -L
/home/matthew/some/other/directory

which $0
/home/matthew/test.sh

readlink -e $0
/home/matthew/test.sh

Creating a symlink to ~/test.sh in ~/some/other/directory, and calling it directly (./test.sh):

matthew@broderick:~/some/other/directory$ ln -s ~/test.sh ./test.sh
matthew@broderick:~/some/other/directory$ ./test.sh
$0
./test.sh

pwd -P
/home/matthew/some/other/directory

pwd -L
/home/matthew/some/other/directory

which $0
./test.sh

readlink -e $0
/home/matthew/test.sh

Creating a symlink to ~/test.sh in ~/some/other/directory, and calling it from yet another location:

matthew@broderick:~/some/other/directory$ ln -s ~/test.sh ./test.sh
matthew@broderick:~/some/other/directory$ cd ~/somewhere/else
matthew@broderick:~/somewhere/else$ ~/some/other/directory/test.sh
$0
/home/matthew/some/other/directory/test.sh

pwd -P
/home/matthew/somewhere/else

pwd -L
/home/matthew/somewhere/else

which $0
/home/matthew/some/other/directory/test.sh

readlink -e $0
/home/matthew/test.sh

Conclusion:
So, it looks like “readlink -e $0” will always return the full, non-symlink, “physical” location of the script (regardless of whether or not symlinks are involved). Looks like “pwd” returns the user’s current working directory reliably.

SQLite is a pretty neat single-file database engine. In their own words,

SQLite is a software library that implements a self-contained, serverless, zero-configuration, transactional SQL database engine. SQLite is the most widely deployed SQL database engine in the world. The source code for SQLite is in the public domain.

There are SQLite libraries and interfaces available for pretty much any software language, but they also include sqlite3, which is “a terminal-based front-end to the SQLite library that can evaluate queries interactively and display the results in multiple formats. sqlite3 can also be used within shell scripts and other applications to provide batch processing features.”

If you have experience writing SQL queries, it’s easy to get started with the SQLite interface. A few non-standard commands that will help you get started are .tables , which lists the names of all tables in the current database, and .schema tablename which describes the schema of the named table. From there, you can use traditional SQL queries to add, modify, and delete rows in your tables. Have fun!

Note: Be sure to do a backup of your database file before mucking about with the sqlite3 interface, sometimes the program crashes, or you might type a dangerous command or something like that.

As part of my work with Wayne and Layne, Adam and I do a lot of work together remotely, since I live in Pennsylvania and he lives in Minnesota. It’s really nice to be able to quickly share a work in progress, whether it be a diagram in Inkscape or a printed circuit board layout in Kicad. Setting up a Skype or other screen sharing system incurs too much transaction cost and isn’t very quick, so I was looking for something quicker and simpler.

I wrote this little script to take a screenshot of my entire display, add a timestamp to the bottom, and automatically upload it to my website. I set up an SSH key between my computer and my webserver (that is unlocked when I login), and added the following script to my path as screenshot_poster.sh

#!/bin/bash
#
# This script will capture the whole screen
# and upload it to the web in a known location
# Written by Matthew Beckler for Wayne and Layne, LLC
# Last updated August 31, 2012

cd /tmp
import -window root temp.png
WIDTH=`identify -format %w temp.png`
DATE=`date`
convert -background '#0008' -fill white -gravity west -size ${WIDTH}x30 caption:"$DATE" temp.png +swap -gravity south -composite screenshot.png
scp screenshot.png user@example.com:/var/www/rest/of/the/path/to/screenshot.png

DEST="http://example.com/path/to/screenshot.png"
# do you want a notification or to just open the browser?
#notify-send -t 1000 "Screenshot posted" "$DEST"
xdg-open "$DEST"

The final two lines allow you to make a little desktop notification of the URL, open a web browser to the image’s location, or both. Someday I will set up a nice keyboard shortcut to run this script, to make the process of sharing my work-in-progress as quick and easy as possible.

screenshot

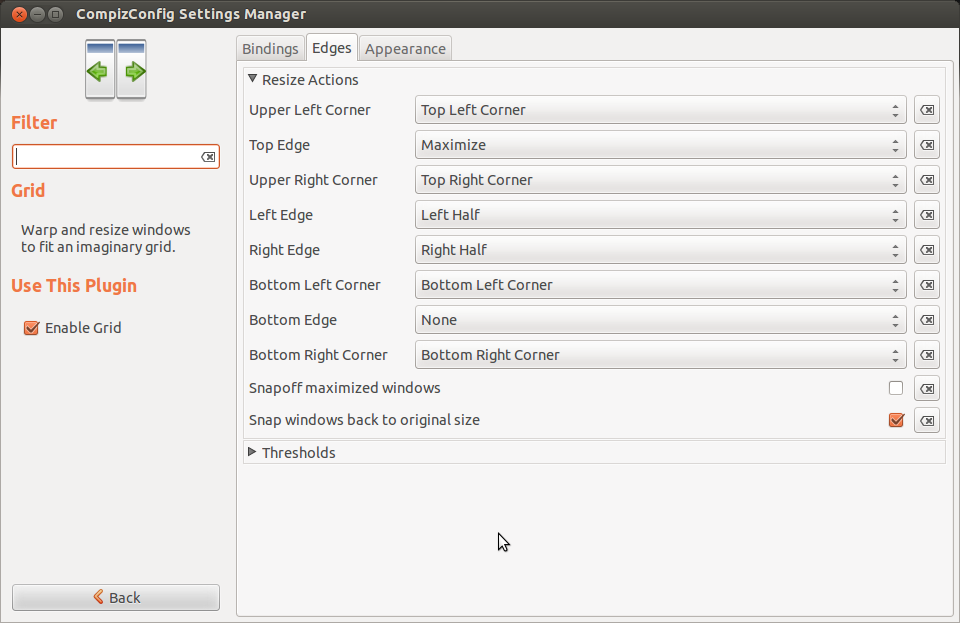
I really enjoy the new feature in recent versions of Ubuntu, where I can drag a window to the top, left, or right edge of a display to resize the window to take up the full area, the left half, or the right half, respectively, of the display. For my 27″ external display, however, I thought it would be nice to make the display corners into drop target that would resize the window to occupy just a corner of the display. Turns out that this functionality is already built-in to the Compiz plugin called “Grid”. You just have to tweak a few settings to enable it.

compizconfit_settings_manager_grid

To access the right settings, you must first install the CompizConfig Settings Manager, so go to the Ubuntu software center and search for that package. Once you’ve installed it, search for the same name from the launcher to start it up. Heed well the warning about seriously messing up your desktop. Click on “Window Management” from the category list on the left side, and then select “Grid”. Select the “Edges” tab, and expand “Resize Actions”. Change the drop-down options for the four corner items to match the corner, as shown in the screenshot above. Now, you can drag a window to the corner of a display to have it resize to fill that quarter of the screen, as shown below.

corner_window_resize

It doesn’t work 100% perfectly with multiple displays, having some troubles and inconsistent behavior with the “shared corners” but it works more than well enough for my needs.

Like all things Linux, there are a dozen ways to do anything, and dozens of how-to guides on how to do it wrong. System logging is no exception. Modern Ubuntu distributions use rsyslog, so this is a guide to setting up remote system logging between two modern Ubuntu machines.

System logging is the way that a computer deals with all the info and error messages generated by the kernel, drivers, and userland applications that should be saved in case they are useful, but aren’t generally immediately needed by the user. So generally the messages are sent to your locally-running rsyslog program, and saved to /var/log/syslog. Remote system logging is where one computer (computer Alpha) will send out all its system messages to a different computer (computer Beta), to be processed/stored there. This can be useful if computer Alpha (the log sender) is having hardware troubles and frequently crashing, making it nice to have a record of what happened in the final few seconds before the crash.

Changes on the log receiver (computer Beta)
Edit the file /etc/rsyslog.d/50-default.conf. Add these lines before any other non-commented lines in the file:
# let's put the messages from alpha into a specific file
$ModLoad imudp
$RuleSet remote
*.* /var/log/alpha.log
$InputUDPServerBindRuleset remote
$UDPServerRun 514
# switch back to default ruleset
$RuleSet RSYSLOG_DefaultRuleset

This loads the “imudp” module which allows us to run a UDP (not TCP) log receiving server. Then we set up a rule set that logs all logs to the file /var/log/alpha.log. We apply that rule set to the UDP server, and start the server on port 514. Then we switch back to the default ruleset, and the rest of the file tweaks that ruleset (where different types of messages end up).

To apply the change, run “sudo service rsyslog restart”. You can use netstat to check which ports have listeners:

sudo netstat -tlnup

Which should produce a line like this:

udp6 0 0 :::514 :::* 27102/rsyslogd

Changes on the log sender (computer Alpha)
Edit the file /etc/rsyslog.d/50-default.conf. Add these lines before any other non-commented lines in the file:
# log all messages to this rsyslogd host
*.* @1.2.3.4:514

This tells rsyslog to send all messages (*.*) to the specified IP address via port 514. To apply the change, run “sudo service rsyslog restart”.

Test it out!
On the log receiver (computer Beta) run this command to watch the log file from alpha:

sudo tail -f /var/log/alpha.log

On the log sender (computer Alpha) run this command to put a silly message into the system log system:

logger Hello World

You should see something like this show up in the terminal on the log receiver:

Jan 10 17:56:53 alpha eceuser: Hello World

TCP instead of UDP
I initially tried to set up the log receiver to listed on a TCP port instead of UDP, but it just wasn’t working, and I’m not sure why.
If you wanted to do TCP instead of UDP you would change the lines for the log receiver configuration, and then use two @@ instead of just one @ in the log sender configuration.

GNU Screen is a really fantastic piece of software. Screen is a “terminal multiplexer”, that allows you to run and manage several terminal instances from a single terminal window. It’s sort of like how a graphical user interface lets you have multiple graphical application windows running at the same time, allowing you to switch between them at will. Screen is really great when working on a remote server over wifi or any unreliable network connection, as a dropped connection won’t kill off your jobs or close all your shells, you can simply reconnect to the screen instance when you reconnect.

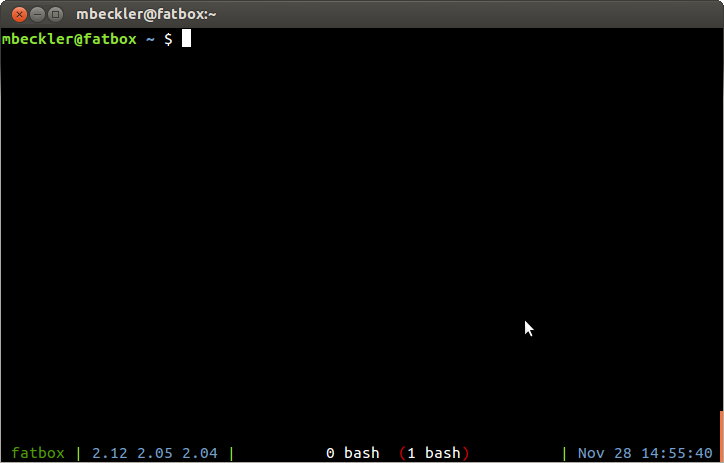
Screen allows you to add a “caption” bar at the bottom of the screen, that sort of acts like a taskbar in a graphical interface. The behavior of the caption bar is controlled by the .screenrc file, and here is what my .screenrc file looks like:
defshell $SHELL
caption always '%{= dg} %H %{G}| %{B}%l %{G}|%=%?%{d}%-w%?%{r}(%{d}%n %t%? {%u} %?%{r})%{d}%?%+w%?%=%{G}| %{B}%M %d %c:%s '

Here is a screenshot of what it looks like:

Basically, the bottom bar displays a bunch of information that you can remove from your prompt. On the left is the hostname (in case you are logged into multiple machines, you won’t get confused this way), then the system load values, and on the far right is the current date and time. The center of the bar is a “task bar” that shows the numbers and configurable names of all the sub-terminals you have in this screen session. (FYI, you can rename your screen session with Control-a A (capital A!), then backspace to remove the default name (usually the name of your shell) and it will update in the “task bar”.)

I used to have an ffmpeg command line that I used to video record a window on my linux desktop, but it stopped working a while ago and I didn’t want to dig into the man pages to figure it out all over again. So, I went looking online to try and see what other people had done.

The best solution I found is a little shell script with a tiny bit of GUI added via zenity. It is called Capture Me, and you can download it at that link. I haven’t ever tried it with capturing audio as well as video, but it will probably work too.