Matthew Beckler's Home Page
:: :: :: :: :: ::
Java Heat Map
Convert Cadence Layout to SVG / PDF / PNG
Makefile -jX setting: How many concurent jobs is optimal?
Infinite Grid of Resistors
How to Start and Stop Folding@Home on OSX
Lego Rendering with POV-Ray
Class Scheduler
Lightsaber Rotoscoping Scripts

Handy Scripts
GPG Tips and Tricks
NCAA Basketball Tournament Data

Isometric Projection in Inkscape
Perspective Motivational Poster
SVG Drawings
SVG Circuit Symbols
Mysterious Textures
Inkscape Animation - SVGAni
Contents:
Introduction :: Solution :: Preview :: Animation Method :: SVG Modifications :: Settings File :: Eval Statements :: Running the Script :: Using Gifsicle to Create Animated GIF :: Downloads
Introduction: When creating website documentation for my various projects, I always like to add drawings and figures to help explain the project. Inkscape (download) is one of my favorite tools, and does a great job of creating and editing vector drawings in the SVG format. Unfortunately, there is no good way to do animation from within Inkscape (at least not yet), so I needed a way to manually do animation from my SVG files.
Solution: I created a small python script that reads in an SVG file and does a search-and-replace to update object colors, positions, rotations, etc. After updating the image, it renders it to a PNG or GIF file, and saves it as one frame of the final animation. The script reads in a detailed settings file that controls all aspects of the animation, including support for automatic GIF conversion, precise control over the index variable, and even allowing for multiple 'phases' of animation. Once all the individual frames have been created, you can use a tool such as gifsicle to create an animated GIF.
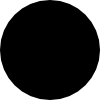
Preview: For purposes of demonstration, I have created a simple image of a ball, shown below on the left. Using the SVGAni script, I created the animation of the color-changing ball shown below on the right, as well as at the top of this page. In the rest of this document, I will show you how to take one of your own SVG drawings, prepare it for animation, create the settings file, run the animation script, and create the animated GIF output file.

![]()
Animation Method: The way this animation works is by defining an index variable (called index) that will be updated for each step (frame) of the animation. You can use this index variable in the search-and-replace statements to change positions, colors, rotations, scalings, and anything else accessible in SVG code. This is similar to the POV-Ray animation method, but a bit simplified. For each phase of the animation, you define a few variables:
- index_start - This is the starting value of the index variable for this phase.
- index_end - This is the ending value of the index variable for this phase.
- steps - This is the total number of frames to produce for this phase. It includes both the start and end values, so if you want N values between the start and end, set this to N+2.
For example, if you had index_start = 0, index_end = 255, steps = 52, you would get the following sequence, which could be very useful for animating a color change in steps of five:
0, 5, 10, 15, 20, 25, 30, ..., 240, 245, 250, 255
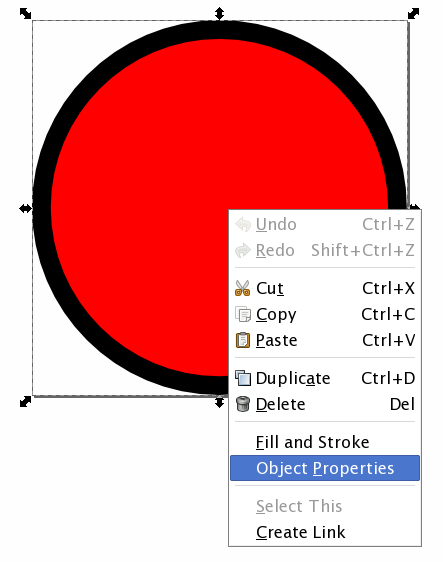
SVG Modifications: In order to prepare our original SVG file for animation, we need to search through and find the values we want to change. For the red ball example, we need to find the position in the source code where the ball's color is specified. For a very simple image such as this one, it's easy to look through the file and find the definition of the ball, but in a large document, it would be difficult to look through that much XML code. To make our search easier, we can assign a special name to the object from within Inkscape. To do this, we select the object we want to label, right click, and select "Object Properties":
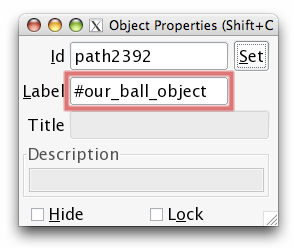
In the dialog box that opens, enter in a descriptive (and hopefully unique) label for this object. Here, I have labeled the object #our_ball_object:
Click "Set" and save the file. If you now open the SVG source file in a text editor, such as Notepad, VIM, or Emacs, we can search for this label. I have extracted the relevant XML from the overall file and placed it below:
<path
     sodipodi:type="arc"
     style="opacity:1;fill:#ff0000;fill-opacity:1;fill-rule:nonzero;stroke:#000000;
            stroke-width:4.57740736;stroke-linecap:round;stroke-linejoin:round;
            marker:none;marker-start:none;marker-mid:none;marker-end:none;
            stroke-miterlimit:4;stroke-dasharray:none;stroke-dashoffset:0;
            stroke-opacity:1;visibility:visible;display:inline;overflow:visible;
            enable-background:accumulate"
     id="path2392"
     sodipodi:cx="41.35112"
     sodipodi:cy="43.175556"
     sodipodi:rx="43.485371"
     sodipodi:ry="43.485371"
     d="M 84.836491,43.175556
        A 43.485371,43.485371 0 1 1 -2.1342506,43.175556
        A 43.485371,43.485371 0 1 1 84.836491,43.175556
        z"
     transform="matrix(1.0923214,0,0,1.0923214,4.8312876,2.838417)"
     inkscape:label="#our_ball_object" />
This is the single XML element that defines our ball. Notice the last attribute is the inkscape:label attribute that has our custom label (highlighted), which allowed us to search through the file to find the right part of the XML code. In this XML object are all the ball's properties and attributes. For this example, we want to change the ball's fill color, so we look at the style attribute. I have highlighted the fill color's definition in the code above. Since there might be other objects defined with fill color of #ff0000 (pure red), we should replace this color with a unique text string, such as #ball_fill_color. After updating the code, this part of the file would now look like this:
<path
     sodipodi:type="arc"
     style="opacity:1;fill:#ball_fill_color;fill-opacity:1;fill-rule:nonzero;stroke:#000000;
            stroke-width:4.57740736;stroke-linecap:round;stroke-linejoin:round;
            marker:none;marker-start:none;marker-mid:none;marker-end:none;
            stroke-miterlimit:4;stroke-dasharray:none;stroke-dashoffset:0;
            stroke-opacity:1;visibility:visible;display:inline;overflow:visible;
            enable-background:accumulate"
     id="path2392"
     sodipodi:cx="41.35112"
     sodipodi:cy="43.175556"
     sodipodi:rx="43.485371"
     sodipodi:ry="43.485371"
     d="M 84.836491,43.175556
        A 43.485371,43.485371 0 1 1 -2.1342506,43.175556
        A 43.485371,43.485371 0 1 1 84.836491,43.175556
        z"
     transform="matrix(1.0923214,0,0,1.0923214,4.8312876,2.838417)"
     inkscape:label="#our_ball_object" />
If there are other objects that you want to animate, you can add unique custom tags to the other values. There are more examples of information replacements in the rest of this document. For this example, our SVG source file is now ready to go.
Creation of svgani.settings file: The svgani.settings file defines all the setting that are used in the process of creating an SVG animation. The file's format is very similar to the old Microsoft INI files, but a bit more flexible. The file has different sections, denoted with a section heading of the form [section_name]. The [general] section is placed at the top of the file, and is required for all animations. That section is followed by at least one phase section, depending on how many phases you need for your animation. Here is the layout of the [general] section, with all options required:
[general]

## This is the input SVG filename:
input_svg_filename: ball_modified.svg

## This is the base of the output filename, and will be appended with
## a four-digit image number, followed by .png
## Example: 'frame_' will become 'frame_0000.png', 'frame_0001.png', etc.
output_png_basename: frame_

## The size of the output images, in pixels.
output_width: 100
output_height: 100

## Do you want the output images converted to gif?
## (requires the ImageMagick utility 'convert')
convert_to_gif = True

## How many phases of animation. If your animation becomes more complex than
## can be handled by creative use of the index variable, then you can have
## multiple phases. Each phase needed must have a corresponding section below
## with names like [phase_0000], [phase_0001], etc.
num_phases: 2

## If enabled, svgani will draw a nice progress bar. If your terminal doesn't
## support fancy ANSI terminal codes (most do), then you might want to disable
## the progress bar.
draw_progress: true

## If you need to use more fancy kinds of functions in your eval strings,
## such as the math module, you can specify any required modules as a
## space-separated list here. Leave it empty (but not commented-out) if
## you don't need to import any extra modules.
modules: math
For each phase of your animation, you need to provide an appropriate [phase_XXXX] section. Each phase section has three required settings (defined above) and as many search-and-replace options as you like:
[phase_0000]

## There is a variable called 'index'. These values control how index
## is changed from one image to the next. Steps should be an integer,
## but the other two can be either integers or decimals.
index_start: 0
index_end: 255
steps: 52

## Inside each phase's definition, the lines are of the following format:
## search_string: replacement_string
## All instances of search_string will be replaced with the result of calling
## python's eval() function on replacement_string.
ball_fill_color: "%02X%02X%02X" % (index,0,0)
More information about the possible replacement string formats is provided in the next section. If you like, you can look at the overall settings file used for the ball example: svgani.settings.
Explanation of Eval Statements: As mentioned above, the animation process automatically sets up the index variable for each frame of the animation. You can reference this index variable in the search-and-replace part of the settings file to dictate how an object's color, position, rotation, etc is controlled by the index value. To provide the most flexible solution, the replacement string from the settings file is evaluated using python's eval function. This allows for more complex behavior, and simplifies the creation and processing if the search-and-replace pairs. In the simple example above, the text string "ball_fill_color" will be replaced with "%02X%02X%02X" % (index, 0, 0). What this means is that the replacement string will be evaluated by python, and the resulting string substituted in for the search string. For our ball animation example, in phase 0, the index variable starts at 0, ends at 255, with 52 steps total. This replacement string is a little snippet of python's string formatting code, which is very similar to standard printf-style string formatting codes. Here, we are printing three numbers, the red, green, and blue values, in standard hex-color-code format. The code "%02X" means to print the value in upper-case hexadecimal, zero-padded to two digits. It performs this conversion for all three colors, and produces a six-digit color code. Notice that the values for green and blue are both fixed to 0, because they are not changing during the course of the animation. Only the red value, set to be equal to the index variable, is changing throughout this animation.
Some examples of replacement strings:
- -120 + 240 * (index / float(255))
If the index is going between 0 and 255, then this code would be evaluated to a value between -120 and +120. The (index / float(255)) part produces a value between 0.0 and 1.0, which is used to add in a proportional amount of the 240. - 10 * math.cos(2*math.pi*index)
If the index is going between 0.0 and 1.0, then this code would evaluate to be a single period of a cosine wave, scaled to be between -10 and +10. If you want an object to travel in a circle, you could set its x-coordinate to this, and set the y-coordinate in a similar way, but with the sin function instead. - 30 * math.pow(index, 5)
Users of other graphical animation packages (such as Adobe Flash) might be used to the ease-in and ease-out functions, where motion starts slowly/quickly and then accelerates/decelerates to the ending position. Using an eval string such as this one (with index going between 0.0 and 1.0) produces an ease-in effect between 0 and 30. The numbers start out slowly increasing, but then start to rapidly increase as the output numbers approach 30. Small exponents (here, 5) produce more constant velocities, while higher exponents produced a more profound ease-in effect, starting out very slow, with a rapid acceleration to high velocity movement at the very end. - 30 - 30 * math.pow(index, 5)
Similar to the example above. The subtraction from 30 produces values that start at 30, and slowly decrease, eventually accelerating towards 0. - 30 - 30 * math.pow(index, 5)
If you set index to go downward from 1.0 to 0.0, then this example will start at 0 and rapidly increase, eventually slowing down as it slowly approaches the value of 30.
Running the Animation Script: Once you have prepared your SVG input file and the setting file, you are now ready to run the animation script. It will produce a number of output images, one for each step/frame of the animation. To run the script, simply provide the filename for the settings file:
matthew@broderick ~/svgani $ ls -1
ball_modified.svg
svgani.py
svgani.settings

matthew@broderick ~/svgani $ ./svgani.py svgani.settings
Importing modules: math
Finished parsing configuration file.
There are 2 phases with 104 total frames.
Rendering phase:    0 (  52 steps)
Rendering phase:    1 (  52 steps)
Finished!

matthew@broderick ~/svgani $ ls -1
ball_modified.svg
frame_0000.gif
frame_0001.gif
...
frame_0102.gif
frame_0104.gif
svgani.py
svgani.settings
Using gifsicle to Create Animated GIF: The linux/unix utility gifsicle is a very nice and simple way to create animated GIF images. Once you have created the images for each frame, you can create a combined animated GIF file like this:
matthew@broderick ~/svgani $ gifsicle --delay=10 --loop frame*.gif > ball_ani.gif

matthew@broderick ~/svgani $ ls -1
ball_ani.gif
ball_modified.svg
frame_0000.gif
frame_0001.gif
...
frame_0102.gif
frame_0104.gif
svgani.py
svgani.settings
Downloads: Click below to download a zip package of SVGAni. The package contains the script file, the settings file, and the original and modified versions of the SVG image file used in the examples. It also includes your very own copy of the GPL. If you find this script to be useful, please send me an email. I'm always interested to see who's using my software.
- Version 1.1: svgani_1.1.zip
Released 2013-02-26 - Fixed a small bug with the output PNG filename. - Version 1.0: svgani_1.0.zip
Released 2009-05-21 - This is the initial release.
Comments? Suggestions? Dissenting opinions? Email Me


Copyright © 2004 - 2026, Matthew L. Beckler, CC BY-SA 3.0
Last modified: 2013-02-26 10:05:14 AM (EST)