Matthew Beckler's Home Page
:: :: :: :: :: ::
Java Heat Map
Convert Cadence Layout to SVG / PDF / PNG
Makefile -jX setting: How many concurent jobs is optimal?
Infinite Grid of Resistors
How to Start and Stop Folding@Home on OSX
Lego Rendering with POV-Ray
Class Scheduler
Lightsaber Rotoscoping Scripts

Handy Scripts
GPG Tips and Tricks
NCAA Basketball Tournament Data

Isometric Projection in Inkscape
Perspective Motivational Poster
SVG Drawings
SVG Circuit Symbols
Mysterious Textures
Extension Cord Outlet Box
This project is also documented at:
The Instructables Website
Introduction: What's going on?
In a past my apartment, we had a room where we keep all our computers and electronics equipment. We built wooden counters around the outside of the room, which gave us each a large amount of workspace. It was pretty awesome and the only thing that was a bit of a pain was having to crawl underneath the desk every time I wanted to plug something into the outlet. I decided to add an outlet to the top surface of the counter.
Note: I've since moved out of this apartment, and would suggest mounting the outlet in the standard orientation, facing outward, instead of facing up. That way, you won't have to worry about spilling or dropping anything into the exposed output. You should also use a GFCI outlet, just in case.
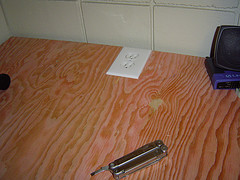
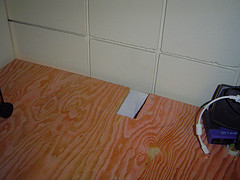
Step 1: Cut an appropriately sized hole.
First, measure the size of your junction box. You could also trace the size onto your surface, which is what I did. You'll then need to cut out the hole. It will be much easier to drill a hole, and then cut out the rest of the rectangular hole.
Since this was in my 'office' room, I didn't want sawdust getting everywhere. In the second image of this step, you can see how I folded a piece of paper to create a chute for the sawdust right into my garbage can. I didn't even have to vacuum after this project.

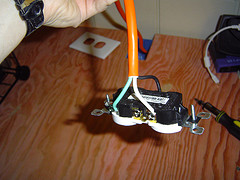
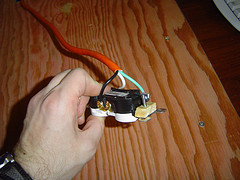
Step 2: Connect extension cord to outlet.
I purchased a 25 foot extension cord. Make sure that the extension cord has all three plugs on it. You'll want to have the grounding action for most applications. I simply removed the "female" end of the cord, for those of you who don't know what that means, it's the end that doesn't plug into the wall. Make sure that the cord isn't plugged into the wall. I then removed approximately two inches of outer insulation, and then stripped away just over 1/2 inch of insulation from each of the three wires.
Bend the end of the wires into a little hook, and use the appropriate screw to connect them to the outlet. The green (sometimes bare copper) wire is the grounding wire, and should be connected to the green screw on the outlet. The two wires left, which will probably be black and white, are the 'hot' and 'neutral' wires respectively. The back of the outlet should say right on it which screws are which. Connect the black and white wires using the appropriate screws.
Oh yeah, make sure that you have fed the end of the cord through the junction box before you start connecting the wires (picture 2), or else you'll have to do it all over again :- )
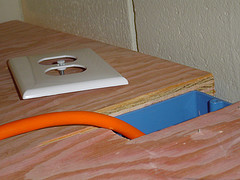
Step 3: Attach outlet to junction box.
As you can see in this picture, my counter is made of quite thick material. about 3/4" thick. The junction box is recessed a bit from the surface of the counter, which made it impossible to securely fasten the outlet to the box, because half the outlet was colliding with the counter, and the other half wasn't.
The gap was about 1/4", so I use a spare piece of shim to create a wooden spacer to solve this problem. I drilled an appropriately sized hole in each piece, and slipped them over the screws. This allowed me to securely tighten the outlet's screws, while keeping the outlet high enough that the faceplate would fit.
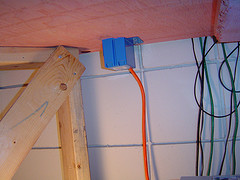
Step 4: Finished Product.
Here are a couple pictures of the finished product.
Picture 1: The top surface of my counter. Now I'll be able to much more easily plug in things such as my soldering iron, a lamp, my laptop computer, battery charger, ATX Lab Bench Power Supply, etc.
Picture 2: The underside of the counter, showing how neat and safe everything is. The extension cord is plugged into my wall outlet under the counter.


Copyright © 2004 - 2026, Matthew L. Beckler, CC BY-SA 3.0
Last modified: 2023-01-09 03:26:27 PM (EST)