Matthew Beckler's Home Page
:: :: :: :: :: ::
Java Heat Map
Convert Cadence Layout to SVG / PDF / PNG
Makefile -jX setting: How many concurent jobs is optimal?
Infinite Grid of Resistors
How to Start and Stop Folding@Home on OSX
Lego Rendering with POV-Ray
Class Scheduler
Lightsaber Rotoscoping Scripts

Handy Scripts
GPG Tips and Tricks
NCAA Basketball Tournament Data

Isometric Projection in Inkscape
Perspective Motivational Poster
SVG Drawings
SVG Circuit Symbols
Mysterious Textures
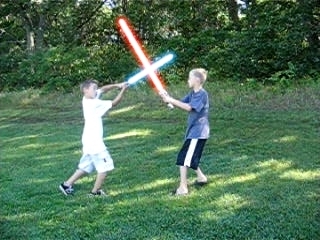
Lightsaber Rotoscoping Scripts
Lightsaber rotoscoping is a neat little hobby I picked up sometime near the end of high school. It involves recording a video of your friends pretending to have a lightsaber fight, using some sort of lightsaber prop, and then editing the individual frames to add the lightsaber glow. Wooden dowels (0.5" diameter) were used in these videos, and are recommended for pretend fighting, as they will certainly break before your skull does, if you accidentally get hit.
The term Rotoscoping means editing a video clip frame by frame, and tracing or applying some other effect to each frame in turn. This is how they did the lightsaber effects in the original Star Wars movies. It's fairly tedious, to draw in the lightsaber blades every frame, but I have created a pair of Python scripts to help improve this process. The longest and most tedious part of the rotoscoping process, besides identifying the blades and drawing them in each frame, is the series of image-editor transformations you need to apply to get the characteristic glow. The guide that I follow, that I found a long time ago, is written by Darel Finley, and is hosted at http://www.theforce.net/. You might want to go read that before reading the rest of this page, to get familiar with the overall process.
The big timesaver with my script is the creation of the mosaic image file. This file is a mosaic of all the original video frames, with a black border between each image. This allows us to draw in the blades, something you need to do for each frame anyway, in one image file. The real benefit arises when we need to apply the filters and transformations. If we edited each file seperately, we would have to go through the same filters and transformations for each file. With the mosaic file, we only need to filter and transform the image once. This saves a lot of time.
The idea of a mosaic file came from Adobe Premier (a video editing application), which has support for a 'timeline' file, which is basically the same thing as my mosaic file. I wanted to create a file format that is more flexible, and less proprietary. These are the reasons I created the following scripts.
The image below is a graphical overview of the process:
- start_project - Convert video to individual frames, assemble big mosaic file.
- Manually edit the mosaic file
- finish_project - Split the edited mosaic, create a finished movie.

Start Project
This script takes in the name of a video file that can be played in mplayer (I always had MJPEG files to work with) and writes out each frame as an individual PNG file. The script will create a new folder with the video file's basename (the name minus extension), put a copy of the original video in the new folder, and rename the original file to "$FILENAME"_original.avi
Then, all the individual frames will be assembled into a large mosaic file. It puts a black border between each image so there is no overlap between frames, a concern once you start applying filters such as Gaussian Blur. The individual frames are no longer needed and are removed. Project information, such as image width and height, number of frames, and size of the black image buffer, are stored in the project_info file.
Download:
- Version 1.01 - download
Usage:
matthew@ralph:~/lightsabers$ ls -1
finish_project.py
mov.mpg
start_project.py
matthew@ralph:~/lightsabers$ ./start_project.py mov.mpg
Parsing command line options ...
Creating work directory 'mov'
Extracting frames from movie ...
Writing project info file ...
Basename: 'mov'
Image width: 640
Image height: 480
Number of frames: 107
Buffer size: 50
Creating mosaic ...
Number of rows: 10
Number of columns: 11
Adding images ........................... done
Writing mosaic file ... done
Removing individual frames ... done

All finished!
Now, just edit the mosaic file "mosaic.png" in "mov/".
You can also edit "audio.wav" to add sound effects or dramatic music.
When you're finished, run this from the current directory to create the output movie:
./finish_project.py mov
matthew@ralph:~/lightsabers$ ls -1
finish_project.py
mov
mov_original.mpg
start_project.py
matthew@ralph:~/lightsabers$ ls -1 mov
audio.wav
mosaic.png
project_info
Manually Edit the Mosaic File
Go read this page, but for now, here's the recipe:- Open mosaic file in Photoshop / The Gimp.
- Save as "mosaic_blades.png"
- Add a new layer on top called "blades". Make sure it's selected.
- Trace over the lightsaber blades with pure white, antialiased. Use the pencil tool with a line width of X for unmoving blades. If a blade is moving and "fanned out", just draw over the whole thing.
- If there is more than one blade in the movie, you have to do one at a time, otherwise the colors will be wrong.
- When all the blades are draw in the "blades" layer, select the background layer, adjust the output levels to 0 to make the BG layer all black.
- Flatten the image into a single layer with black background with white blades drawn in each frame.
- Gaussian Blur equal to line width, X pixels.
- Adjust lower input level to 30, upper input level to 50.
- Duplicate the single layer, put the new layer on top and call it "loose auras". Make sure this new layer is selected.
- Gaussian Blur of about 2X.
- Adjust upper input level to 10.
- Gaussian Blur of about 2X.
- Adjust upper output levels of individual color channels (Red = (255,0,0), Blue = (0,127,255), Green = (0, 255, 0)).
- Adjust upper output level to 127.
- Rename background layer to "blades". Move it to the top. Make sure it's selected.
- Duplicate the blades layer, put the new layer on top and call it "tight auras". Make sure it's selected.
- Gaussian Blur 0.5X.
- Adjust upper input level to 10.
- Gaussian Blur X.
- Adjust upper output levels of individual color channels just like you did before.
- Put the blades layer on top. Make sure it's selected.
- Gaussian Blur 3/8 X.
- Change mode of "blades" layer from "Normal" to "Screen".
- Do the same for the "tight auras" layer.
- Flatten image, then save.
- Re-open mosaic file, copy and paste the finished blades into the original mosaic file.
- Change the pasted layer's mode to "Screen".
- Everything should look awesome!
- Flatten image and save as "mosaic.png".
Finish Project
This script splits the mosaic file into individual images, after you've edited the mosaic file in Gimp/Photoshop. It then combines the individual finished frames and the audio.wav file into a finished movie.
Download:
- Version 1.01 - download
Usage:
matthew@ralph:~/lightsabers$ ./finish_project.py mov
Parsing command line options ...
Reading project_info file ...
Creating output directory ...
Splitting mosaic ...
Number of rows: 10
Number of columns: 11
Loading mosaic file ...
Splitting images ..................... done
Converting finished frames into movie ...
Cleaning up ...
All finished!
matthew@ralph:~/lightsabers$ ls -1
finish_project.py
mov
mov_finished.avi
mov_original.mpg
start_project.py
Finished Results
Here is the end result of the video I was working with during this guide:
Download Finished Video (AVI, 5.4MB)


Copyright © 2004 - 2024, Matthew L. Beckler, CC BY-SA 3.0
Last modified: 2011-05-17 09:20:57 AM (EDT)